WordPress is a very popular platform for website development because it offers a lot of amazing features. But it is no different from other platforms when it comes to error occurrence. From permission issues to php-related problems, different types of errors can occur on a WordPress website. Some of them are easy to fix while some others are very difficult to diagnose. This can be a serious issue, especially when you are not tech-savvy. To make the process of monitoring and diagnosing errors convenient, you can set up WordPress error logs in your wp-config file.
What is the Need to Setup WordPress Error Logs?
As the name suggests, WordPress Error log is the list of all the error codes along with the time at which they occurred. You can enable error logs on your WordPres website by making a few small changes in the code of the wp-config file.
The wp-config file is a configuration file containing important WordPress settings. Apart from controlling the website settings, it is also used as a very useful debugging tool that will help you find and fix errors. From this file, you can enable debugging mode and save WordPress error logs.
When you set up WordPress error logs, it becomes easy for you to identify the plugins or scripts that are causing a particular error. If you have an idea about the problem-causing factor, you can fix the error.
When to Set Up Error Logs?
You should consider setting up WordPress error logs in the following situations:
- When you see a blank screen while trying to load your website.
- If you see a warning with an error code (401, 404, 500, etc.) appears.
- If your entire site crashes.
- When you notice that your website has become slow.
- If a plugin or theme is not working properly.
- If you are curious as to which plugins or themes are causing performance issues.
How to Set Up WordPress Error Logs in WP-config File?
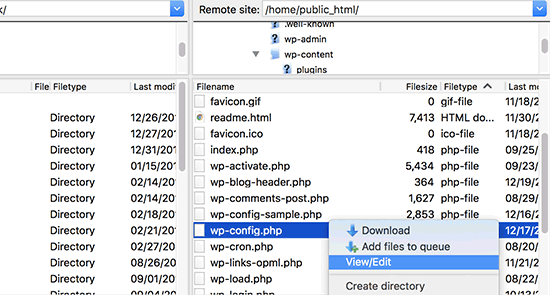
To set up WordPress error logs, you will have to edit the wp-config file. To access this file, you can either use an FTP client or File Manager app in cPanel.
Although It is a simple process and the chances of something going wrong are very less. But as a best practice, you should always create a copy of your wp-config.php file before you start editing. Even a small error in the file can make your site inaccessible. Taking a backup beforehand will save your website from going down if something goes wrong in the process.
Go to the root directory of your website and there you will find the wp-config.php file. Open this file in any text editor and at the very bottom you will see a line saying ‘That’s all, stop editing! Happy blogging.’ Just before this line you will have to add the following line of code:
Also Read: Top 6 WordPress Backup Plugins
define( ‘WP_DEBUG’, true );
There is also a possibility that you will find this line already present in that file but the value is set to ‘False’. If this is the case, just change the value to ‘True’.
Doing this will turn on the debugging mode. The only disadvantage of doing this is, you will start getting the WordPress errors and warnings inside your admin area as well as on the front page of your website.
To turn on the WordPress error logging, you will also have to add the following line of code in your wp-config.php file just below the WP_DEBUG line.
define( ‘WP_DEBUG_LOG’, true );
After this, save your changes and upload the wp-config.php file back to your website. This will also keep the errors and warnings hidden on the front end of your site. When the error and warning messages are hidden from your visitors, it ensures a seamless user experience for them.
How to Review WordPress Error Logs?
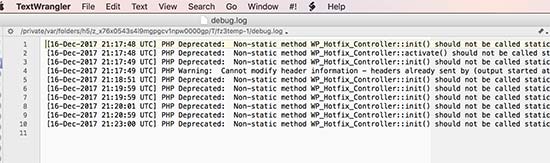
For this, visit your WordPress website and access the pages that were resulting in errors or warnings. After this, connect your website using a FTP client or file manager app in the WordPress hosting cPanel. Once it is connected, go to /wp-content/ folder and there you will find a file called debug.log. You will only see this file if your website has encountered any errors.
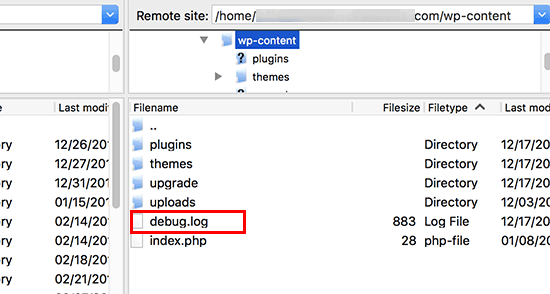
To check the error log, download this file. This file will contain all WordPress errors, warnings, and notices that were logged. It can be viewed and edited. You can download, view, or edit this file.
At this point, you can try to fix the problem(s) that have occurred on your website. The WordPress error logs help you understand the root cause of the errors you have been facing. When you know what is causing an error, fixing it becomes a lot easier.
Also Read: Top 10 WordPress Security Plugins
Final Thoughts!
Hopefully, this article has helped you to understand what is the need of setting up WordPress eros logs. Here, we have also explained the process of enabling error logging using the wp-config file.
Still have some doubts about this? To get some expert advice you can call us on 1-866-332-O276. Our team of WordPress experts will assist you with all your queries.
FAQs:
QA: What is the wp-config file?
Ans: WP-config file in a website is a configuration file that contains important WordPress settings. It is also used as a very useful debugging tool that will help you find and fix errors.
QA: How can we access the WP-config file on a website?
Ans: To access the wp-config file, you can either download and use an FTP client or a file manager tool in your host’s cPanel.
QA: How can we enable error logs in a WordPress website?
Ans: To turn on WordPress error logs, you will have to edit the wp-config file and make a few small changes in the code.
QA: After turning on the debugging mode, where will the warning messages be visible?
Ans: You will start getting the WordPress errors and warnings inside your admin area as well as on the front page of your website.
QA: Is it possible to enable WordPress error logs using a plugin?
Ans: Yes, you can use a plugin like WP Debugging to enable WordPress error logs.