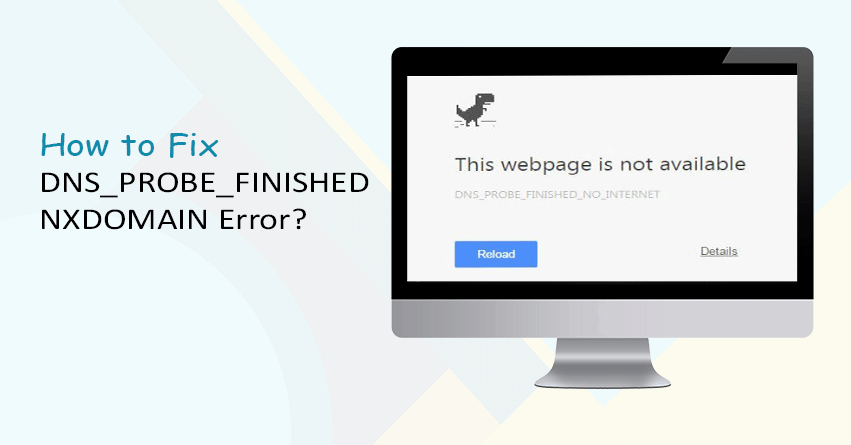
While running a WordPress website, it is a very common thing to come across a few errors every now and then. Errors like white screen of death, DNS probe errors or the ones related to database connection are very common. DNS probe errors can be very very annoying as they leave the users in a frozen state and they cannot get redirected to the target website. When such an error occurs, you will see a message on your screen saying dns_probe_finished_nxdomain error has occurred on this website.
At this point you must have started wondering what this error is, what are the causes and how can we fix it. In this blog, we are going to discuss every important aspect of this error.
What is this Error?
The dns probe finished nxdomain error takes place when there is an issue with your DNS. This issue can be a misconfiguration or something else. Basically, DNS stands for Domain Name Server which connects domain names with actual web servers to direct traffic on the internet. In other words, this system processes a human-friendly request and translates it into a computer-friendly IP address.
Whenever a user enters a URL in the web browser, DNS starts the process of connecting it to the IP address of the actual server. This is called DNS name resolution and a DNS recursor starts querying different nameservers to figure out the actual IP address of a server. Generally, the user is redirected to the target website but if it fails then you will receive the DNS_PROBE_FINISHED_NXDOMAIN error.
You May Also Read: How to Transfer A WordPress Site to New Domain?
How to Fix DNS_PROBE_FINISHED_NXDOMAIN Error?
Now that you have a clear understanding of what a DNS probe error is, we will talk about all the possible methods to fix this.
Check the URL:
The most common factor that causes this error to occur is an incorrect URL. First of all, you should check if there is any mistake in the domain name. Also, double check the entered URL and see if there are any other typing mistakes. If you find any mistake then enter the correct URL again and your issue will be fixed in no time.
Restart the Computer:
This is another basic solution that can fix the problem for you. If you are certain that there is no error in the URL you have typed, you can move on to this method. All you have to do is, turn off your computer and turn it back on. If you are experiencing this issue on your mobile phone or tablet, you can restart that device also. In most of the cases, this gets rid of the error.
Reset the Chrome Flags:
This solution can be used when you are using Google Chrome browser and then start experiencing the DNS probe error. If you have recently installed some new extensions then there is a chance that your browser settings are all messed up. At times, these browser settings can interfere with the DNS settings also and as a result, you will see a DNS probe error. If this is the caes, you can reset the Chrome flags back to the default settings and get rid of this issue.
For this, you have to:
- Type chrome://flags in the address bar and press ‘Enter’.
- On the top-right corner, you will see a ‘Reset All’ button. Click on this button.
Now you can restart the browser and the website will get back to normal.
Disable the Antivirus Software:
There can be times when VPNs or your antivirus software starts conflicting with network settings and DNS server configurations. If you are facing the DNS probe error and you have a VPN or antivirus software installed on your system then this might be the cause of this error. In such a case, you will have to temporarily disable the VPN or antivirus software.
To do this, locate the software among your device’s applications and programs and then right-click on it. This will give you an option to ‘disable. The method of disabling can vary from one software to another.
Flush the Browser Cache:
Browser cache is another common reason for the occurrence of DNS probe error. Clearing the cache can fix the issue for you. The method of clearing out the cache can vary from one browser to another. For example, in Chrome you have to:
- Open a new tab. In the top-right corner, you will see an icon with three vertical dots. Click on it.
- This will open a new menu. Select ‘More tools’ and then click on ‘Clear browsing data’.
- On the next window, go to the Advanced tab. Now make sure that all the boxes next to Cookies and other site data and Cached images and files are selected.
- Click on the Clear data button.
Now you can restart your browser and visit the website once. Your website should get back to normal.
Flush the Local DNS Cache:
If clearing out the browser cache does not fix the issue then there are chances that this issue is related to the local DNS cache. You can clear out the local DNS cache. This way you also get rid of all the stored IP addresses of previously visited websites.
For this, you have to:
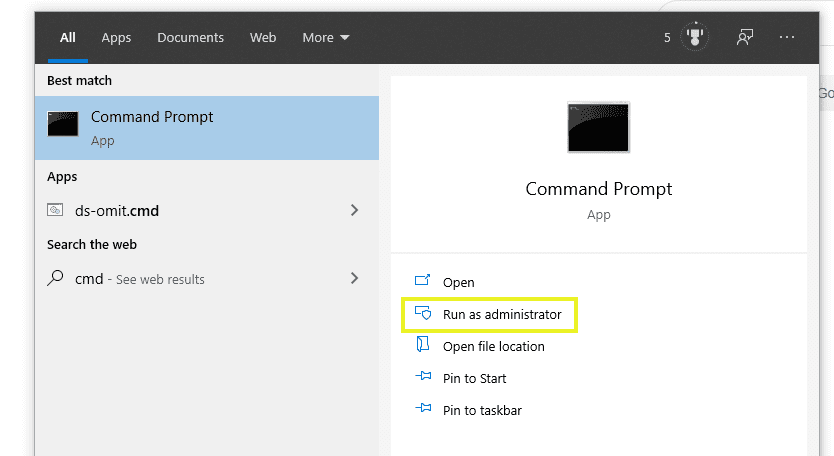
- Click on the Windows logo and then type ‘cmd’ in the search bar.
- This will show the option for Command Prompt application, select Run as administrator.
- Now you might see a window asking you to allow the app to make changes to your device. Click on ‘Yes’.
- When the Command Prompt window opens, you have to type a command: ‘ipconfig/flushdns’ and press Enter.
- Now you will see a message indicating the DNS cache was successfully flushed.
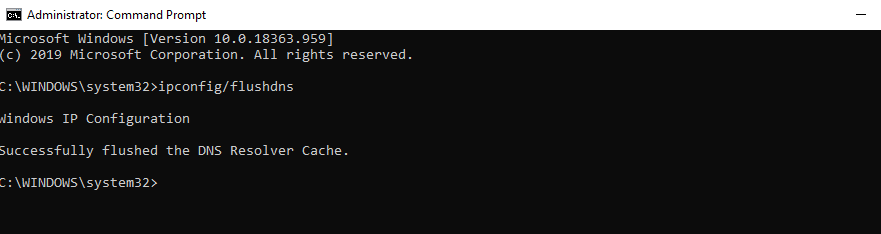
This should fix the issue and you will be able to access your website.
Release and Renew the IP Address:
If the above solutions do not work then you can try this method. For this, you will have to release and renew the IP address.
To release and renew your IP address, you have to open the Command Prompt application using the steps mentioned above. Now enter the following commands and press Enter after each command.
- ipconfig/release
- ipconfig/all
- ipconfig/renew
- netsh int ip set dns
- netsh winsock reset
This will release and renew your IP address and also reset the Winsock on your system. Now you can visit the website to check if it is back to normal or not.
Change DNS Server:
Generally, your Internet Service Provider assigns the DNS server. If you are not able to fix this issue then you can try changing the default DNS server to another.
To change the DNS server to the Google public DNS, you have to follow these steps:
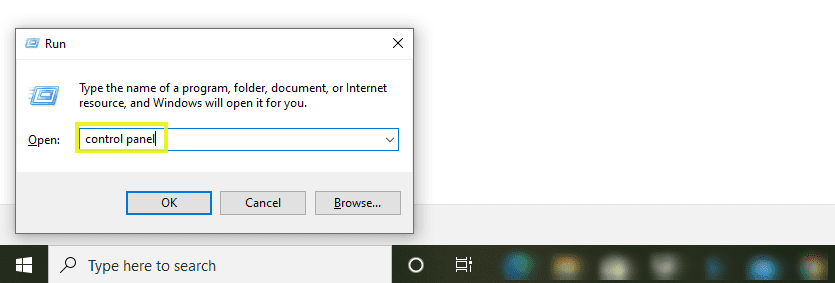
- Press and hold the Windows and ‘R’ button on your keyboard. This will open the ‘Run’ panel in the bottom-left corner of your screen.
- In that box, you have to type in ‘control panel’ and click on ‘OK’.
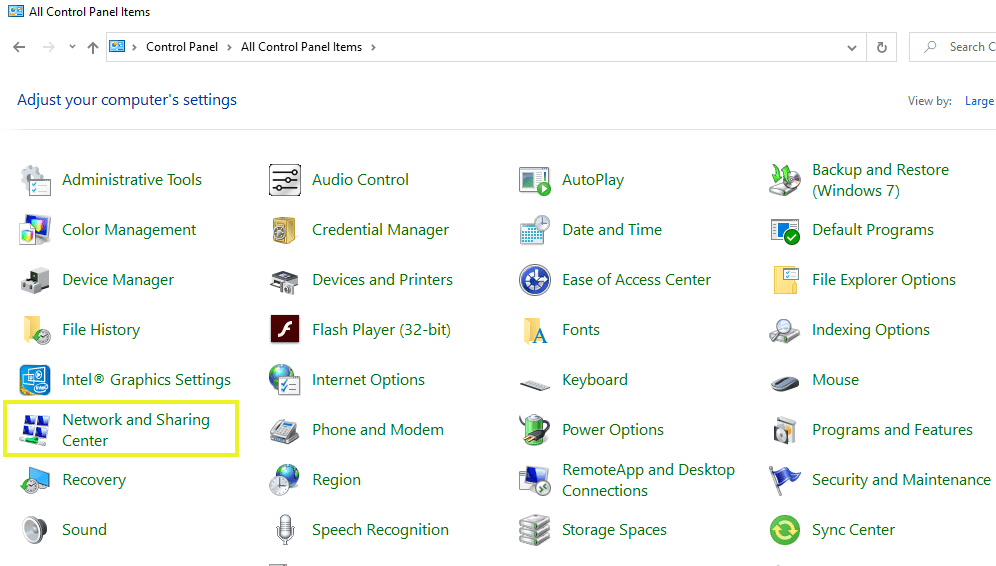
- When you have the control panel window open, click on ‘Network and Sharing Center’.
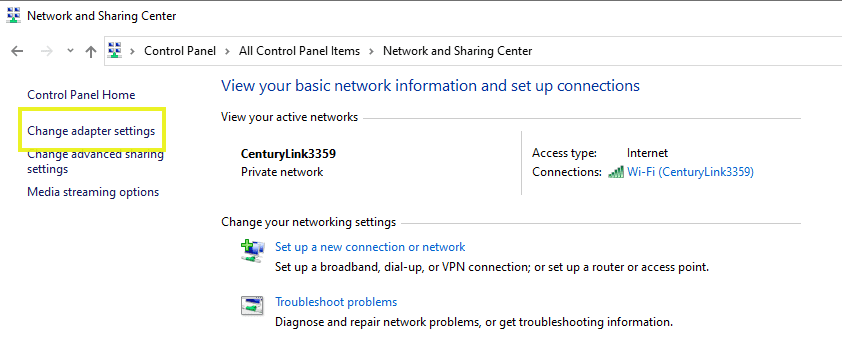
- On the next screen, select the ‘Change adapter settings’ option which is on the left side.
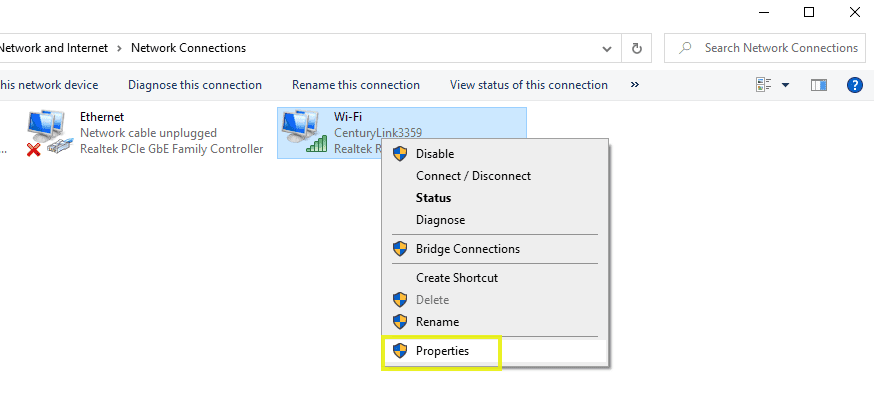
- Right-click on the connection you are currently using, then select ‘Properties’.
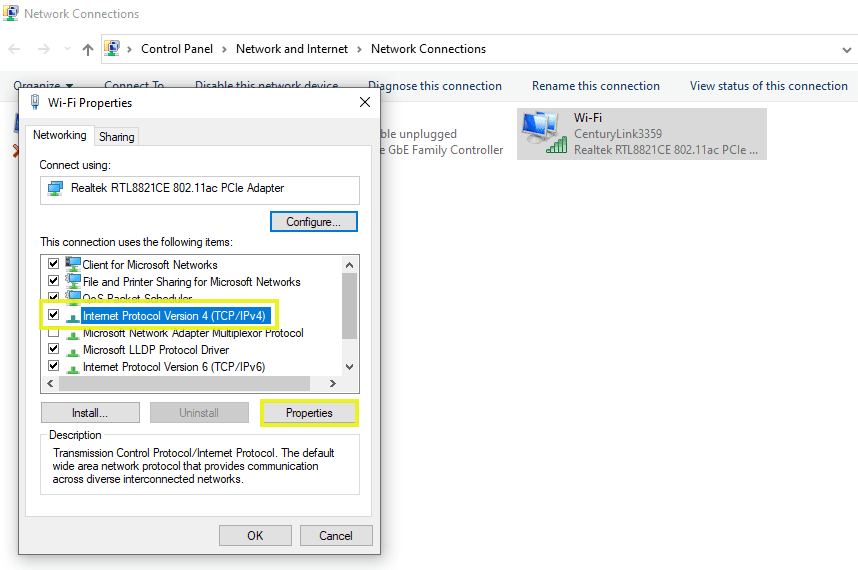
- This will open a new window on your screen. Here, select Internet Protocol Version 4 (TCP/IPv4), then click on the ‘Properties’ button.
- Go to the ‘General’ tab and select the option ‘Use the following DNS server addresses’.
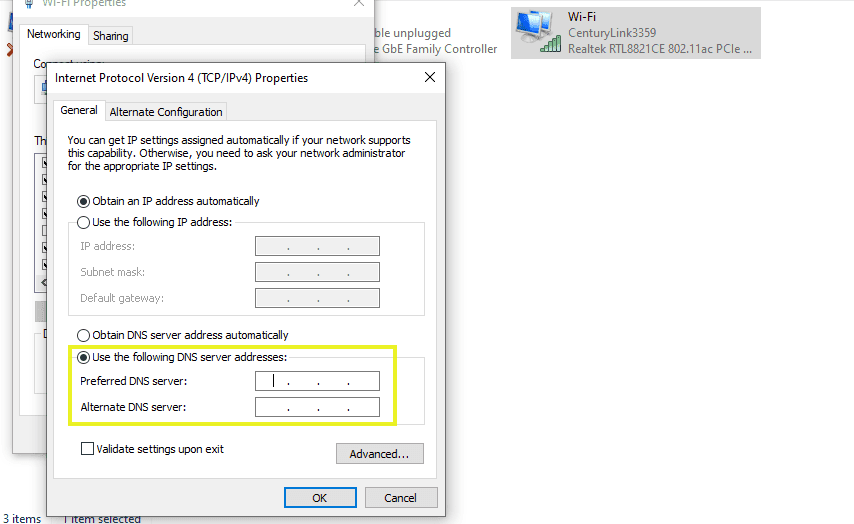
- Now enter the following values for each field:
- Preferred DNS server: 8.8.8.8
- Alternative DNS Server: 8.8.4.4
- Click on OK.
After all these steps, you can go to your website and check if the error is resolved or not.
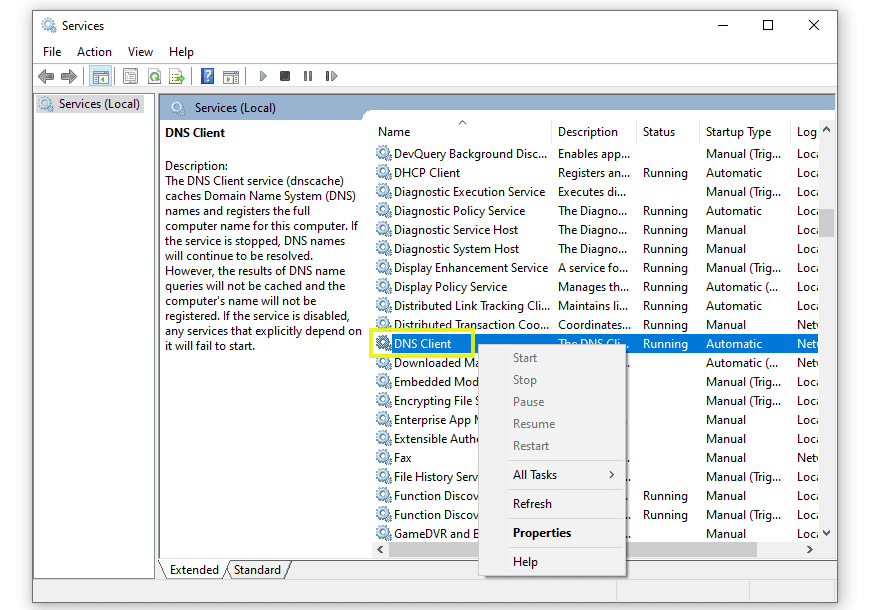
Restart the DNS Client Service:
When you create a DNS server on a Windows device, the DNS runs as a service to cache and resolve domain names. By restarting the DNS client service, you can fix the DNS probe error you are facing.
For this, you have to:
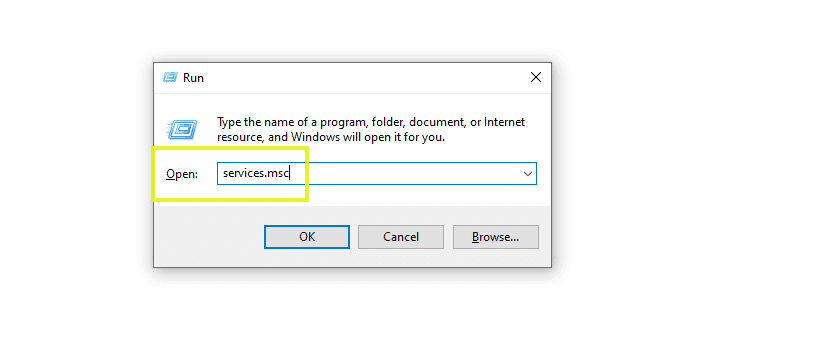
- Open the Run panel, type ‘services.msc’ and click on OK.
- On the next screen, go to the Name column, locate and right-click on the DNS client. Now select Restart.
You May Also Read: How to Create a Business Email?
Check the Local Host File:
If none of the above solutions work then you can try this one to get rid of the DNS probe error. Make sure the domain you’re trying to access is not listed in the local ‘hosts’ file of your computer. This file is only used for previewing a DNS before switching to a new host. However, if it was somehow accidentally changed,this can cause the DNS probe error.
To check the local host file, you can use any text editor like ‘Notepad’.
- Click on the Windows logo, search for ‘Notepad’ then select Run as administrator.
- In the text editor window, select File > Open, then go to ‘C:\Windows\System32\drivers\etc\’.
- Select and open the ‘hosts’ file.

- here , you can check if the domain of the site you are trying to access is not listed within that file. If it is there, you can delete it and save the file.
Wrapping Up!
Hopefully, this article has helped you to fix the dns_probe_finished_nxdomain error on your website.
Still have some doubts about this? To get some expert advice you can call us. Our team of WordPress experts will assist you with all your queries.